Sunday, February 20, 2011
GIVEAWAY ALERT North East of Arizona!
Meredith is having her first giveaway!! Congrats Meredith!
Click on the above link "Memories By Merdith" then look for the February 10th Entry to enter and win!
Good Luck!
Saturday, February 19, 2011
Happy Valentines Day!!!
Ask me if I'm not excited!!! I got yummy cupcakes from where else? Cupcakes! Some hunny loves me! I had hinted at that one and didn't want anything more but today I got a Vermont Teddy Bear too!

I need to add that I did had to go to the ER for my pinkie. With all the wild things that have been happening with my meds, lupus, diabetes and pain problems, I did not have much of a choice. That evening I hit a 10+ on the scale! I'm getting spots again on my head! Those things are awful! Methotrexate is on the agenda so I need to make an appointment with my RA to get started. I'm not feeling good about this medication move but the other stuff is not helping with the swelling. I guess that means the lupus is taking a step in it's direction. I know that I will get better again but I'm afraid of the problems that can occur taking the Methotrexate. This is the moment that I pray and leave everything up to Him! Good news is after 6 weeks of a bad cold, I'm FINALLY over it.:D
okay, now for the goods...
Okay! What got done for Valentines? WOW! Last week was my lil bugs party and I did 10 mailboxes (11 if you count the dog), the same amount in Valentine cards and a Valentine for Hubby!
 This is one of the 11 mailboxes that I made for the Preschool Valentines celebration! As I said I used Cricut cartridge LOVESTRUCK 2010 and the Expressions to cut! I used Bazzil Prismatics-White for the Mailbox. Doted Swiss-Ballet Up was used for the hearts on the flag and the mailbox door. Monochromatic-Raven was used for the name, and Pomegranate for the flag and closure heart on mailbox. I know that I should have done more but the hands were a bit swollen and were not doing what I would have liked. They were perfect as is!
Valentine for Hubby 2010
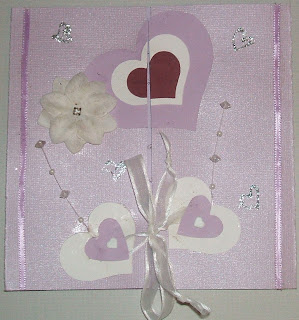 This the card I made Valentines 2010 for my handsome hubby! The Lavena ribbon on the sides and the closure ribbon is from our wedding! The knife for cutting the cake was decorated and I took the ribbons, the flower with rhinestone and the lavender beaded baubles from that very piece to make this Valentine! Here's a good question for Hubby when you give him this: "Do you recognize any of the stuff on your Valentine"?
The cardstock is all Bazzill! I know that the card was made with Bling-Infatuation, the White hearts are Prismatic-White. I believe that the Red heart is Prismatic-Red Carpet. But not sure about the lavendar hearts! :o(
This is this Years card!

I am learning to Emboss, hence the Anti Static bag above! And I really wanted to do all kinds of things I've not done. I embossed the front with a stamp, "I Cherish our Friendship, an I will love you now, and forever". I embossed on a pink velum from a Making Memories-Watercolor Brite pack (I've never used velum before this). I placed the velum over a fun Valentines printed paper, Fancy Pants Designs-Love Birds Collection - Only One. The card and 3" heart are Bazzill Monochromatic- Pomegranate and the 1" heart is Monochromatic- White. The printed paper was cut with Martha Stewart, large punch around the page-Double Arches.
 From left to right top: The first is ribbons and lace, some were smaller white lace flower with the same black lace flower. The flower center done with stickles as is the entire flower. Here is an excellant video to make the flowers: http://www.scrapbook.com/videos/?m=view&v=1299&c=1&w=ribbon+flower TIP: To achieve length of ribbon or lace to make flower, multiply the width of the ribbon or lace by 12 then you will have the length in inches to cut it! The Center is a paper flower. This was made with Bazzill Prismatics, Raven and the printed paper is Lily Bee Design-Christmas Town Collection- Night Divine. The last on top is a quilled (my version of a pansy) in black and red. Quilling is relatively easy for those with working fingers! For quilling there are a few items you need! My suggestion is to purchase a kit, it contains two types of quill tools (purple), tweezers, circle measure with ruler, quilling strips, glue, detailed beginner instructions on quilling and a few instructions on how to make a few finished quilled items, a few cards and frames last but not least you have a wonderful clear and purple container to keep it all in for future quilling use! Just google search 'quilling kit'. I did that and there are some for $20. WOW, that was a mouthful! The bottom row from left to right: The first is ribbons and lace done with light blue lace with dark blue satin ribbon. The Center is a paper flower. I used Bazzill Prismatics Nautical Blue Light and the printed paper is We Are Memory Keepers-Old Glory paper pack (using that stock!) the last on the bottom is a felt rose in dark blue. I used stickles Stary Night for a little sparkle.
"Love at first Bite!" His teeth retract as all good vampires do! Isn't he gorgeous? So is the hubby who got him for me! I am a big vampire fanatic.
I need to add that I did had to go to the ER for my pinkie. With all the wild things that have been happening with my meds, lupus, diabetes and pain problems, I did not have much of a choice. That evening I hit a 10+ on the scale! I'm getting spots again on my head! Those things are awful! Methotrexate is on the agenda so I need to make an appointment with my RA to get started. I'm not feeling good about this medication move but the other stuff is not helping with the swelling. I guess that means the lupus is taking a step in it's direction. I know that I will get better again but I'm afraid of the problems that can occur taking the Methotrexate. This is the moment that I pray and leave everything up to Him! Good news is after 6 weeks of a bad cold, I'm FINALLY over it.:D
okay, now for the goods...
QUILTING:
Sewing sort of counts! I am starting the Jeans Pocket Hanger for Martica's Swap! I am keeping busy! I am dusting off the sewing machine for that so if I'm pulling it out of retirement I am going to make this TOATALLY worth it! That means I will be on scrap hiatus for a while.
Sewing sort of counts! I am starting the Jeans Pocket Hanger for Martica's Swap! I am keeping busy! I am dusting off the sewing machine for that so if I'm pulling it out of retirement I am going to make this TOATALLY worth it! That means I will be on scrap hiatus for a while.
SCRAPP'N: All kinds of good bits tonight!
Homemade Anti Static Bag for Ebossing! EASY TOO!

- a clean pair panty hose or a single stocking
- baby powder or corstartch ( I like the smell of the baby powder especially if I'm dealing with icky smelling stuff)
- A tall glass
Cut the top off the pantyhose as far up the leg as you can. or just to where the reinforced bit starts. Put the toe of the stocking inside the glass about 4 inches hanging inside. pour in the powder or cornstarch enough to fill an inch or of the toe. Carefully pull out the stocking and twist the top twice making a ball at the toe where the powder is. pull the other side over the ball and twist twice again. Continue to do this till you have a enough to make a knot at the end.
I left enough at the end made my knot then made a lace flower but before I tied the ends to make the flower I put it arount the knot and then pulled the ends of the string around it making the top a nice little grasp flower! :) For those who have never made a ribbon/lace flower:
http://www.scrapbook.com/videos/?m=view&v=1299&c=1&w=ribbon+flower
A super HUGE thank you to Linda Israel for this information! SHE IS AN INCREDIBLE ARTIST!! http://lindaisrael.com/2010/06/13/how-to-make-an-anti-static-bag-for-embossing/
Okay! What got done for Valentines? WOW! Last week was my lil bugs party and I did 10 mailboxes (11 if you count the dog), the same amount in Valentine cards and a Valentine for Hubby!
Mailboxes for Valentines

Valentine for Hubby 2010

The cardstock is all Bazzill! I know that the card was made with Bling-Infatuation, the White hearts are Prismatic-White. I believe that the Red heart is Prismatic-Red Carpet. But not sure about the lavendar hearts! :o(
This is this Years card!

I am learning to Emboss, hence the Anti Static bag above! And I really wanted to do all kinds of things I've not done. I embossed the front with a stamp, "I Cherish our Friendship, an I will love you now, and forever". I embossed on a pink velum from a Making Memories-Watercolor Brite pack (I've never used velum before this). I placed the velum over a fun Valentines printed paper, Fancy Pants Designs-Love Birds Collection - Only One. The card and 3" heart are Bazzill Monochromatic- Pomegranate and the 1" heart is Monochromatic- White. The printed paper was cut with Martha Stewart, large punch around the page-Double Arches.
Handmade Flower Swap

To make the paper puffy flower: I used the Cricut Cartridge Mothers Day Bouquet, sixth row, second flower, long 9 petals. The same flower is on; Accent Essentials - page 41,Walk In My Garden - page 25 has a long 7 petal flower that would work as well.
- For one flower cut one, 3" , one, 2.5", one, 2" and one 1.5" from solid cardstock and printed paper>
- Glue flowers together, gluing just in the center, alternating from cardstock to the printed paper, from largest (3" flower) to smallest (1.5" flower).
- Push center of flower with pinky finger or rounded bottom of wooden spoon and pull the petals upward.
- Let the glue dry completely. When glue dries, gently curl each petal toward the outside of the flower.
- When you get to the last layer, 1.5 inch petals, glue the end of each petal to the bottom.
- Use a button or large brad for the center.
To make the felt rose: (wool felt is best!)
- Cut a circle, about the size of a DVD, to get about a 2" completed rose.
- Cut a spiral around from the outside to the inside of the circle.
- Start to roll from outside of circle to the inside. while doing this use tacky glue or glue gun intermittently to keep it secure.
- Roll to end the securing with glue.
- Pinch the rose from the bottom and the center moves up a bit.
- Trim the edges with small 'V' cuts and form petals on the edges of a few layers of the rose. You can do this before hand, but I like doing it after. Rose is complete!
Wow! Is that it?? Yup LONG week but I'm glad! I'm beat. 3 days late but I got ya!
Friday, February 4, 2011
HAS IT BEEN TEN DAYS ALREADY ? ?
WOW!! I was sitting there at the table and thought, 'gee, it's been a while'. I looked at the date on my last blog and thought it's time to write!
We are barely getting over that nasty cold! Hubby is still a little nasalie and the baby got so bad he got a secondary and ended up on antibiotics! Baby bear had it, gave it to us and now is getting 'it' or something like 'it' again! His working till midnight does not help matters any. Hopefully this will be the last of it! I still a little stuffy but I really think I might just fight it off after 5 weeks! The lupus and diabetes plays havoc with your ammune system. Not nice at all.
Ross is doing okay, the feeling good because the baby just wants him is starting to ware off. Huh, go figure! He won't let me bath him, or do anything else unless daddy is there or he does not want me there at all. Going outside or going out? Mommy, mommy I want to go with you. Food? Yup, you guessed it! I'm the goto person for that too! Ross is getting tired of it, I feel bad when I try to help but all we end up with is more screaming and fussing! Time-out is not working as well as it did in the beginning.
Our little creature feature. We love him to death but his mood is driving us nuts! As I said I think that and being overworked at home is killing him! The bugs going to school has helped a bit. We have that short lull on Tuesdays and Thursdays which does not charge the batteries completely but it helps! His appetite has gone down and he is streching like crazy! His jeans that fit for 2 years have all of a sudden gotten too small. The 24 month shirts are fitting NO MORE. Yes, he is 3 and a half years old, I should have known this was going to happen but it still is a shock to see and feel ($$)!!
My 240zx driver has worked so hard on his car it is so nice to see him driving it again! For a while he was driving my vehicle (not that I drive it but it is still mine) for a while or the hubby truck. He is working till midnight now like I said and it makes me so sad to see him working so late. He has school at 8 am and I know that is not easy. Granted the school is literaly spitting distance away. Yes, baby bear has gone to the neighbor at the end of the cul de sac and spit at the school to prove me wrong. After three tries he found I was not wrong. Ahhh yes! The joy of boy! I am hoping we can do something special after he graduates from High School!
Me. Not much to tell. I've said that before and ended up with a NOVEL! I've been busy finishing the flowers for my handmade flower swap. 3 different flowers for each person in your group (4). I am in blue group and black group. I've got ribbon roses to do for each and I'm done! Finally! The swelling in my fingers gets really difficult sometimes. I drop things more often and find that sometimes they cramp up so that I've got clenched fists and WHAMO! Trigger finger(s)! Not always at the same time, thank goodness! But it has happened. I'll be starting the Methotrexate in a few weeks. I'm afraid of taking it but we'll see what happens. Pain situatin has been a steady 6 the past few days with the occasional 7-8 evenings (like now).
QUILTING
The only thing I've done isdesign the labels for my last two quilts OHHHH, I did make stick pins and the whatcha mawhosie that I made to display the pins is quilted. So I guess that counts! I quilted this as one of my practice pieces and decided it was worth using to stick my stick pins on! The flower is made from fabric and felt flowers from 3 birds-flower packets. The stick pins are extremely easy! They are just corsage pins with the pearl tops. I've colored them with Sharpie markers ( I got the 24 color pack) then beaded on a few beads, spacers and Swarvoski crystals. Between each I added less than a drop of liquid cement (please don't ask how I did it, I still have nightmares!) I think that was the most difficult was working with the liquid cement!
I have a swap due on the 12th of March. I'm not sure which category to put it in to. Seeing how it involves sewing I'll put it here! They are jean pockets! You use them for a LO, to hang in the scraproom (put pens, pencils, rulers) or just hang them to look pretty! I'll post that one either next time or after that! They are cute!
SCRAPP'N
I've been the happy swapper! I've not recieved my tags yet but the due date is the 12 of February. I have my cards completed. I think I've finally learned how to do cards! I've been over complicating it and putting way too much on my cards. Sometimes I think it is okay. Other times, maybe not. Here are the othe two participents for the card swap:
You ever want to get one of those cards 'Thinking of You' for someone, and there is NEVER enough room for everything you want to write? Well I made this an A2 card! I made the pink snowflake for the card in my second to last blog post. It still got used for a card! It is Anna Griffin, Isabelle Collection, 12 x 12 Glittered Paper - Pink and Green Tiles, corners are hand cut and punched with a 'corner adorner-fleur di lis', the horn snowflake is from Cricut cartridge Winter Lace and the butterfly is from American Crafts, Dear Lizzy Enchanted Collection, Details, vinayl pieces - Hyacinth
Playing with my new toy! Sizzix Texture boutique. The embossed flower is from that and I've added a little ColorBox Cat's Eye, Archival ink in pinkolicious. The blossom fabric flowers went well here! They are from the 3 birds blossom packets from above. Pink and Green seemed to be on the agenda for the past weeks in my cards! Cricut cartridge Wall Decor and More was used for the flourished word 'enjoy' Button is a wool fabric pink button! It was from one of my moms late 50's outfits!
I had to do a sympathy card and wanted to make it look a little birghter than your typical sympathy card. This was made with the Cricut Imagine, color from Cricut Imagine cartridge Country Fair (not in poor taste honest!), a little blue lace, 1 paper flower and a gray brad. The words 'With Sympathy' are from Cricut cartridge Caligraphy Collection.
I am in the process of finishing up my flowers but I volunteered for the preschool Valentines day goodies and I also piped in to do little mailboxes for each one of the kids! I could not help it! I saw them in the Valentines Cricut cartridge, 'Love Struck 2010', and I've been wanting to do them since Valentines last year! So far so good! I'll be showing off those and the rest of my flowers next time.
Night night all! 2:17 AM, it's cold, RA letting me know it's there and I think I'm turning in early!
We are barely getting over that nasty cold! Hubby is still a little nasalie and the baby got so bad he got a secondary and ended up on antibiotics! Baby bear had it, gave it to us and now is getting 'it' or something like 'it' again! His working till midnight does not help matters any. Hopefully this will be the last of it! I still a little stuffy but I really think I might just fight it off after 5 weeks! The lupus and diabetes plays havoc with your ammune system. Not nice at all.
Ross is doing okay, the feeling good because the baby just wants him is starting to ware off. Huh, go figure! He won't let me bath him, or do anything else unless daddy is there or he does not want me there at all. Going outside or going out? Mommy, mommy I want to go with you. Food? Yup, you guessed it! I'm the goto person for that too! Ross is getting tired of it, I feel bad when I try to help but all we end up with is more screaming and fussing! Time-out is not working as well as it did in the beginning.
Our little creature feature. We love him to death but his mood is driving us nuts! As I said I think that and being overworked at home is killing him! The bugs going to school has helped a bit. We have that short lull on Tuesdays and Thursdays which does not charge the batteries completely but it helps! His appetite has gone down and he is streching like crazy! His jeans that fit for 2 years have all of a sudden gotten too small. The 24 month shirts are fitting NO MORE. Yes, he is 3 and a half years old, I should have known this was going to happen but it still is a shock to see and feel ($$)!!
My 240zx driver has worked so hard on his car it is so nice to see him driving it again! For a while he was driving my vehicle (not that I drive it but it is still mine) for a while or the hubby truck. He is working till midnight now like I said and it makes me so sad to see him working so late. He has school at 8 am and I know that is not easy. Granted the school is literaly spitting distance away. Yes, baby bear has gone to the neighbor at the end of the cul de sac and spit at the school to prove me wrong. After three tries he found I was not wrong. Ahhh yes! The joy of boy! I am hoping we can do something special after he graduates from High School!
Me. Not much to tell. I've said that before and ended up with a NOVEL! I've been busy finishing the flowers for my handmade flower swap. 3 different flowers for each person in your group (4). I am in blue group and black group. I've got ribbon roses to do for each and I'm done! Finally! The swelling in my fingers gets really difficult sometimes. I drop things more often and find that sometimes they cramp up so that I've got clenched fists and WHAMO! Trigger finger(s)! Not always at the same time, thank goodness! But it has happened. I'll be starting the Methotrexate in a few weeks. I'm afraid of taking it but we'll see what happens. Pain situatin has been a steady 6 the past few days with the occasional 7-8 evenings (like now).
QUILTING
The only thing I've done isdesign the labels for my last two quilts OHHHH, I did make stick pins and the whatcha mawhosie that I made to display the pins is quilted. So I guess that counts! I quilted this as one of my practice pieces and decided it was worth using to stick my stick pins on! The flower is made from fabric and felt flowers from 3 birds-flower packets. The stick pins are extremely easy! They are just corsage pins with the pearl tops. I've colored them with Sharpie markers ( I got the 24 color pack) then beaded on a few beads, spacers and Swarvoski crystals. Between each I added less than a drop of liquid cement (please don't ask how I did it, I still have nightmares!) I think that was the most difficult was working with the liquid cement!
 | ||
| This is a loop da loop stitch with stars |
I have a swap due on the 12th of March. I'm not sure which category to put it in to. Seeing how it involves sewing I'll put it here! They are jean pockets! You use them for a LO, to hang in the scraproom (put pens, pencils, rulers) or just hang them to look pretty! I'll post that one either next time or after that! They are cute!
SCRAPP'N
I've been the happy swapper! I've not recieved my tags yet but the due date is the 12 of February. I have my cards completed. I think I've finally learned how to do cards! I've been over complicating it and putting way too much on my cards. Sometimes I think it is okay. Other times, maybe not. Here are the othe two participents for the card swap:
You ever want to get one of those cards 'Thinking of You' for someone, and there is NEVER enough room for everything you want to write? Well I made this an A2 card! I made the pink snowflake for the card in my second to last blog post. It still got used for a card! It is Anna Griffin, Isabelle Collection, 12 x 12 Glittered Paper - Pink and Green Tiles, corners are hand cut and punched with a 'corner adorner-fleur di lis', the horn snowflake is from Cricut cartridge Winter Lace and the butterfly is from American Crafts, Dear Lizzy Enchanted Collection, Details, vinayl pieces - Hyacinth
 |
| Thinking of you card |
Playing with my new toy! Sizzix Texture boutique. The embossed flower is from that and I've added a little ColorBox Cat's Eye, Archival ink in pinkolicious. The blossom fabric flowers went well here! They are from the 3 birds blossom packets from above. Pink and Green seemed to be on the agenda for the past weeks in my cards! Cricut cartridge Wall Decor and More was used for the flourished word 'enjoy' Button is a wool fabric pink button! It was from one of my moms late 50's outfits!
 |
| Enjoy! card |
I had to do a sympathy card and wanted to make it look a little birghter than your typical sympathy card. This was made with the Cricut Imagine, color from Cricut Imagine cartridge Country Fair (not in poor taste honest!), a little blue lace, 1 paper flower and a gray brad. The words 'With Sympathy' are from Cricut cartridge Caligraphy Collection.
 |
| A different sympathy card |
I am in the process of finishing up my flowers but I volunteered for the preschool Valentines day goodies and I also piped in to do little mailboxes for each one of the kids! I could not help it! I saw them in the Valentines Cricut cartridge, 'Love Struck 2010', and I've been wanting to do them since Valentines last year! So far so good! I'll be showing off those and the rest of my flowers next time.
Night night all! 2:17 AM, it's cold, RA letting me know it's there and I think I'm turning in early!
Subscribe to:
Posts (Atom)